
TWO PIECE HANDICAP (white removes rook and bishop) is probably the most frequently played handicap, as well as the most thoroughly analyzed one. It is considered very instructive, and it is the first handicap we have come to in which black is generally advised to castle before attacking, as he would in an even game. Black has a huge material advantage, but with no weak edge to attack there is no reason to hurry. Although two piece is a huge handicap, in actual practice it is not so easy to beat a pro who wants to win, even if he allows you to start the game on move 17 with your formation completed. It is generally said that you must be 2 Dan to have an even chance with a pro at this handicap, and if it's a serious head to head timed game I think 3 Dan might be more realistic. As there is a wealth of professional analysis on this handicap there is very little room for improvements, so almost all the following variations are taken from the Japanese literature. Special thanks to Shoshi Kazuharu 6 Dan, for much of the following analysis. Izumi Masaku 7 Dan, Kiriyama Kiyosumi 9 Dan, and several other pros are also prime sources.
Most pros recommend that black establish a vanguard of twin pawns on 4e and 3e, which should force white's silver to 2b, and then after castling attack in the center. There are two ways for black to do this: the "crab castle" strategy using the rook on the third file, or the "twin silvers" strategy using the rook on the center file. The crab castle is more popular, though it is said that the twin silvers actually scores better in practice. Perhaps this is because many of the best lines for black in the crab castle require spectacularly brilliant play, which may be too difficult for a player receiving two piece handicap. The twin silvers gives black a safer king, but white gets a better shape and the chance of an entering white king is higher. We will begin with the crab castle, which is also considered the most instructive. It is best to learn both, as certain unusual early white strategies work well against one plan but not against the other. For example, omitting ... P5d is effective against the twin silvers but has little merit against the crab castle, since black usually doesn't attack the fifth file.
One word of warning: Some of these variations are quite difficult, and some of the final positions are not so simple to win. Furthermore, sometimes small differences in the position call for a change in plan. It is not possible to analyze the handicap to a clear win for black, in contrast to the handicaps we have examined so far. For this reason, playing two piece handicap can be enjoyable for both sides, even if black knows the "book" well. There is enough scope for white to vary his play and force black to think for himself. Still, black can usually afford several errors before he loses the advantage, while white is apt to lose badly after even one error.
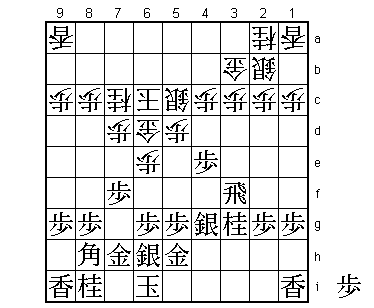
1... S6b 2 P7f P5d 3 P4f S5c 4 P4e (to prevent the obstruction of the bishop by ... P4d, though Manabe Kazuo 8 Dan and some other pros advocate the alternate plan of provoking ... P4d and then attacking it) G3b (4... P5e and 4... K4b are important alternatives which we will examine later) 5 S4h (black rushes the silver forward to eliminate any possibility of ... P5e) K5b 6 S4g G6b 7 P3f (note that black does not play S4f or P5f as he plans to guard his 7f pawn with a rook on 3f) P7d 8 P3e S2b (if white omits this black can force the silver there anyway by P3d followed by taking on 3c and dropping on 3d) 9 R3h (to get a pawn in hand and to post the rook on 3f where it works on both rank and file) P6d 10 P3d Px3d 11 Rx3d P*3c (11... S3c 12 R3f P*3d is met by 13 N3g P2d 14 S4f intending P*3e) 12 R3f K6c (Generally the safest square for the white king at this handicap; also the king guards many key squares from here) 13 N3g (Knight behind rook is a good shape in shogi; the knight guards the rook's "ears" and the rook guards the "head" of the knight) G7c 14 G7h (only now that the attacking formation is complete does black take the time to castle) P6e 15 K6i G6d 16 G5h (black should not prevent ... P5e by 16 S4f or 16 P5f due to 16... P7e 17 Px7e Gx7e and black can no longer drive back the gold by 18 P*7f) N7c (16... P5e is well met by 17 S4f S5d 18 P5f Px5f? 19 P*5e) 17 S6h This completes the crab castle, often seen in even games. The golds are said to be the eyes of the crab. It's a sensible formation, because none of the generals controls the square on which the king sits, which would be pointless. It is recommended at this handicap because it is the strongest castle against a frontal attack, though weak against a rook on the back rank. So black will not hesitate to sacrifice a bishop for a general to break in to white's position, but should not sacrifice his rook without getting major compensation.

After 17.S6h
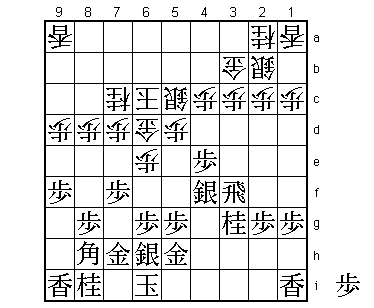
17... P8d 18 P9f! (Having the option of B9g is important in some lines, and the escape square for the king doesn't hurt either) P9d 19 S4f

After 19.S4f
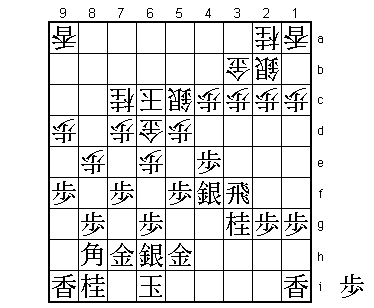
19... P8e (19... P7e 20 Px7e Gx7e 21 S3e P6f 22 Bx6f! Gx6f 23 Rx6f S6d 24 P*7d N6e 25 G*7f B*5e 26 Gx6e Bx6f 27 Gx6d Kx6d 28 Px6f R*3i 29 S5i, and although black has lost rook for silver and knight, his advantage in king safety is overwhelming. It is usually good for black to sacrifice bishop for gold and pawn on 6f if he can take with the rook at the end, because white needs the missing pawn to defend) 20 P5f (20 S3e is also book, meeting 20... P5e by 21 S4f S5d 22 P5f Px5f? 23 P*5e, but 22... P6f! 23 Px6f Px5f 24 S6g S3a or 24... G4b is a bit tricky; also 20... P6f 21 Bx6f P5e 22 B8h S5d 23 S4f K5b is tough to refute)

After 20.P5f
21... L1b (Planning a later ... S3a to reactivate this poorly placed piece; then P3d Px3d B1a+ will not capture a lance. An alternative is 20... P7e 21 Px7e Gx7e 22 P5e! (because the king is now poorly defended) Px5e 23 P*5d! Sx5d 24 Sx5e Sx5e 25 Bx5e S*6d 26 B4f P*5e 27 B3e S5c 28 P*7f G7d 29 S*7e G4b 30 Sx7d Kx7d 31 P*5d Sx5d 32 B6b+ with decisive advantage; 20... P6f 21 Bx6f G6e 22 B8h Gx7f 23 P5e is another line) 21 S3e (21 P5e is less convincing here) S3a (Note how white tries to bring the silver back to the center as soon as it is tactically feasible, in part due to 20... L1b; white can first throw in 21... P6f 22 Bx6f P5e 23 Px5e S3a, which may be met by the advance P2f-2e, followed by R2f or R4f depending on white's play) 22 P4d (22 P*3d Px3d 23 Sx3d P*3c 24 Sx3c+ is also good, though perhaps less convincing) S34b (22... Px4d 23 Sx4d Sx4d 24 Bx4d S*5c 25 B2f P*4d 26 P*4e or 25... P*4c 26 N4e S4d 27 S*5c Sx4e? 28 S6b+ mate) 23 N4e S6b (23... Sx4d 24 Sx4d Px4d 25 Bx4d S*6b 26 P*3d G4c 27 Px3c+ Gx4d 28 +Px4b) 24 Px4c+ Sx4c 25 P*4d S5b 26 P*3d P5e 27 Px3c+ Nx3c 28 S4f! pinning and winning the knight.
| Variation I | White plays to obstruct the bishop with a timely pawn sacrifice | ||
| Variation II | White plays to avoid the exchange of generals at all costs | ||
| Variation III | White concentrates solely on making it hard for black to break in | ||
| Variation IV | White plays to get a pawn in hand | ||
| Variation V | White sacrifices two pawns to block the bishop and centralize his offside silver | ||
Lessons from this handicap :