![]()
![]()
Lance handicap (left lance removed, right lance handicap was abolished about a hundred years ago) is not too popular, because if a fight erupts in the center of the board the extra lance may be irrelevant or even a liability, an extra piece for the opponent to capture and use. Some clubs have abolished it, though the Shogi Renmei clubs and the Shoreikai still employ it. Many amateurs refuse to accept lance handicap, choosing just to play first in an even game instead. It is the aim of this article to show that this attitude is wrong and that lance handicap deserves its place in the handicap spectrum.
Clearly, at lance handicap White should play ranging rook and castle towards the side where he retains a lance, since a castle without a lance is a damaged castle. Black's strategy is far less clear. In the majority of games, Black plays static rook, aiming for a quick attack generally involving a sacrifice on the 1c pawn. However, there are some problems with this plan. As with quick attacks in even games (static vs. ranging rook), Black will generally be the first to break through and promote pieces, but White has the better castle (Mino vs. boat), so the game remains close. Furthermore, White has various ways to prevent a quick breakthru and/or to start a fight in the center, even on slightly unfavorable terms. Then there is the practical objection that one needs to learn a great many razor-sharp variations just for a handicap that will be rarely played. Therefore, I recommend instead "Plan B", in which Black also plays ranging rook. Instead of trying to exploit the extra lance by quick attack, he takes advantage of the fact that White will not have a lance pressing on Black's king.
The specific plan I advocate is one (of three) analyzed in a recent book on handicap shogi by Takahashi Michio, pro 9 Dan. I recently tried out the strategy against handicap expert Shoshi, pro 7 Dan, and although I hadn't yet had time to learn it well and misplayed the opening somewhat I obtained a promising position (the game was unfinished due to time constraints). The plan is simple : range the rook to the seventh file, move the king to the right, exchange off the pawn in front of the rook, make an Anaguma castle, and attack by a timely S7f, B7g, and P6e, and/or by an edge attack. The point of this line at lance handicap is that in an even game, White would attack the Anaguma on the edge by a timely P1e and N-1g-2e (after exchanging off the 2nd file pawn). The absence of the lance makes it safe for Black to hide in the Anaguma, while White dare not do the same due to this edge attack threat. Black's advantage is thus transformed into having a safer castle as well as the option of an edge attack against the enemy castle. In my opinion this strategy gives Black a clear advantage, though of course not so large an advantage as he should obtain at the major piece handicaps. Let's look at Takahashi's analysis, together with the lessons learned from my encounter with Mr. Shoshi.
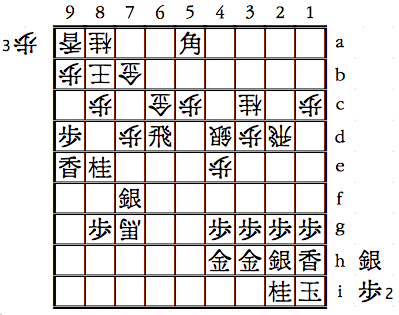
1... P3d 2.P7f P4d (An early bishop exchange should favor Black, as the missing White lance leaves Black more drop squares for his bishop.) 3.R7h S4b (White rushes a silver to 4c to defend 4d against the threat of P7e, P7d, Rx7d and Rx4d !.) 4.P7e S4c 5.K4h B3c 6.K3h R2b (This is the standard way to play double ranging rook in even games, since the rook can now support an attack by a timely P2f.) 7.S6h P2d
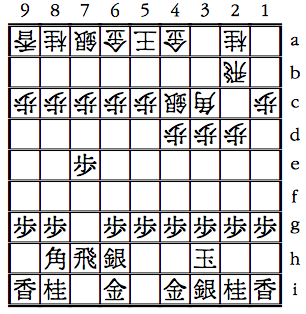
After 7.P2d
(It might be more accurate to make castling moves first, with the idea of not capturing when Black plays P7d. Then when Black eventually captures on 7c, play will transpose to our main line, except that Black's rook is on 7h instead of 7i. This is how Shoshi 7 Dan played against me. This difference slightly favors White, but as we'll discuss later it's a minor point.) 8.P7d Px7d 9.Rx7d S8b (White aims for the Yagura, or Fortress, castle. If instead 9... P*7c 10.R7f and Black will get to make both an Anaguma castle and an Ishida formation by N7g, P9f, and B9g. White is likely to be stuck with no counterplay.) 10.K2h P2e 11.G3h !
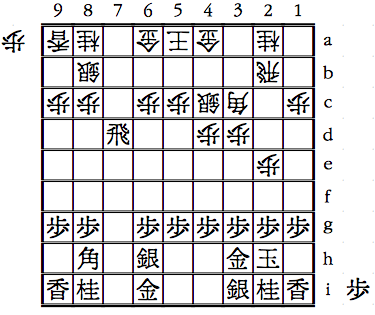
After 11.G3h !
(This is needed so that when Black plays K1i later he can answer P2f by taking and dropping a pawn on 2g.) K6b 12.L1h G4a5b 13.K1i G7b 14.P6f (to give the silver access to 6g) S7c 15.R7i (15. R7f is only logical if Black intends N7g and the Ishida shape, but here the rook would be a target for a timely S8d-7e. This illustrates why the Fortress castle is said to be White's best bet in this line.) P*7d 16.S6g P6d 17.G5h (Black chooses this over G5i aiming to put this gold on 3i because in a game with the kings on opposite sides the attacks usually come from the front rather than from the sides, so the Anaguma with all three generals on the second rank is more appropriate.) G5b6c 18.S2h K7a 19.G5h4h K8b (Both players have completed their castles, Anaguma vs. Fortress.) 20.P9f P9d (Otherwise Black has an attack against the edge by P9e and N8e.) 21.S7f P2f 22.Px2f Rx2f 23.P*2g R2d (In an even game White would play R2h and follow up by P-1f-1e and N-1g-2e.) 24.B7g S5d (to deter P6e) 25.R6i P4e 26.P9e ! Px9e 27.P*9d
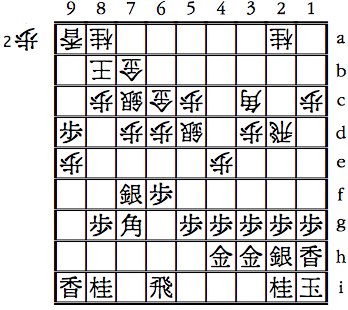
After 27.P*9d
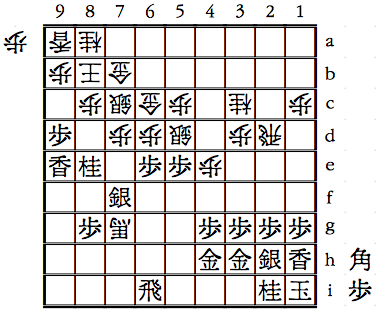
(This edge attack is effective, because if 27... Lx9d 28.S8e or 27... S8d 28.P6e, with advantage for Black due to the weakened sixth file.) B4d 28.Lx9e P*9b (The result of the edge attack is the loss of running room for the White king. Now a central attack will be more deadly.) 29.P5f (The purpose of this move is to prepare P6e which if played now would allow the reply 29... P*2f 30.Px2f Rx2f and the attack on the silver is very annoying. P5f blocks the fourth rank.) N3c 30.P6e

After 30.P6e
(Now it's time to consider what we would do if White had not captured on 7d back on move eight. We would ultimately reach this same position, but with the rook on 6h instead of 6i. It would then be advisable to play R6i before attacking with P6e, due to the danger of a silver or bishop drop on 5i later, so White would have a free move. His most useful move is P1d, with ideas of disturbing the Anaguma by P1e and P1f, even without a lance behind this pawn. But this is unlikely to make any difference, because Black will attack before this becomes possible. However the pawn on 1d does prevent B*1e, so it may affect things slightly.) Bx7g+ 31.Nx7g B*4d (if 31... Px6e 32.Sx6e with attack and the threat of B*1e R2c S*3b. Even if White had played P1d earlier, preventing B*1e, Black should be doing well here.) 32.N8e B7g+ (Takahashi points out that if White tries to avoid the knight for silver exchange by 32... S8d, then 33.Px6d G6c6b 34.P*7c is very strong, because if 34... Nx7c Black exchanges knights and forks the rook and bishop by N*3f.) 33.P5e !
After 33.P5e !
(This is a nice disruptive move, because if the promoted bishop takes this pawn, Black can take the silver and then the pawn on 6d without losing his own silver.) Sx5e 34.B*5a S4d 35.Px6d Sx6d 36.Rx6d !
After 36.Rx6b !
(Giving up the rook is viable thanks to the solidity of the Anaguma castle.) Gx6d 37.P*7c Nx7c (If the gold retreats 38.S*6b is decisive.) 38.Nx7c+ Gx7c 39.N*8e +Bx9e (If 39... G7c6c 40.S*7c wins quickly.) 40.S*7a ! Kx7a 41.Nx7c+ +Bx7c 42.Bx7c+ R2b 43.P*6b R*7b 44.G*6a K8a 45.+Bx6d S*8b 46.B*6c White can safely resign. Black's Anaguma remains perfectly intact.
Lance Handicap Summary :