

Rook and lance handicap (white removes rook and left lance) is a special favorite of mine to analyze, because the absence of the lance focuses play on that sector and leads to forcing variations. When the handicap consists of only major pieces, black is usually advised to complete his formation and play very patiently, but when a lance is missing it generally pays to attack fairly early, before fighting might develop elsewhere, rendering the extra lance irrelevant. Generally, black finds it easier to break thru and promote his rook than he does at two piece handicap, but it is more difficult to win after promoting because the bishop gives white counterplay. Generally this handicap is considered appropriate for an amateur 3 Dan against a pro, though the late Hanamura 9 Dan usually defeated amateur 4 Dan players this way, and once even beat a Pro 2 Dan in a magazine game !
There are several attacking systems recommended by pros for this handicap. The most widely recommended is right fourth-file rook (as in rook handicap), but preceded by exchanging off the lance pawn with the rook's help. This is a fairly slow system, and while it is undoubtedly very good, there are many variations, some of which are not totally convincing. Another good system involves a very early lance sacrifice, but here too some of the lines seem a bit less than overwhelming. The climbing silver is recommended by some pros, but I think this is the least convincing of the main lines; the variations are too dissimilar and complex.
I decided to opt for the knight attack, primarily because of a new refinement by Masaki Izumi 7 Dan, involving castling right instead of left. The knight attack consists of exchanging off the lance pawn with the aid of the rook, and then after a few preparatory moves playing N-1g-2e combined usually with P*1b. This will normally lead to promoting the rook at no cost other than the few moves needed to set up this plan.
Let's start with classical play by white :
1... P3d 2 P7f P4d (It is possible to make or allow the exchange of bishops, just as it is at rook handicap, but the subsequent play will be even more difficult for white because of possible bishop drops on 1a or 1b or captures on 1c) 3 P1f S3b (or S4b) 4 P1e S4c (lines with P2d, here or in similar positions, will be considered later under the heading "blocking lines". They are generally met by a climbing silver attack. Another white option, now or on the next move, is ... S3c to meet a later N2e by S2d, but this should make an attack on the fourth file effective for black.) 5 R1h P5d 6 P1d Px1d 7 Rx1d P*1c 8 R1h K6b 9 S3h (This is important for the knight attack, because black intends P2f and wants to guard 2g against later drops) K7b 10 G65h
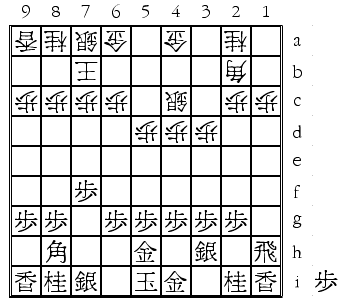
After 10.G65h
(Masaki Izumi's new idea, making a Mino castle. Previously G6h usually followed by K6i was standard, following the proverb "keep the king and rook far apart". But G6h has the big drawback of setting up a possible knight fork on 7f. Since black plans to exchange off his right knight, this is a real problem. White often drops a knight on 8d at a time when 7f is hard to defend, or may plan P7e without fearing PxP due to N*7f. More generally, white usually attacks on his right, since black's dragon will dominate the other side, so it seems to make sense for black to castle right here. In an even game, this way of playing would allow the enemy rook to break in easily, but since he lacks a rook here it should be okay.) 10... S6b (10... G3b 11 P2f P2d 12 P*1d ! G2c 13 Px1c+ Gx1c 14 R2h P*1d 115 L1f ! is strong) 11 P2f (vital to be able to meet a later ... P2d by P2e) G3b (later we will consider the important consequences of omitting this move) 12 N1g
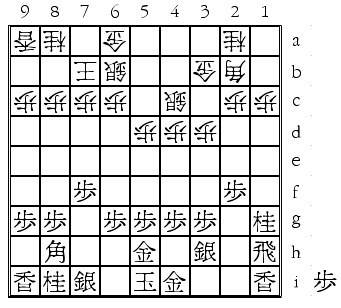
After 12.N1g
(Here you may wonder why we don't move our king into the Mino castle before attacking. The answer is that if white resists by ... P2d in the next couple of moves we will open up our right side, and the king will be safer on its home square. Only after we make a dragon will it be wise to move into the castle.) S5c (12... N3c 13 P*1b P2d [else P1a+, N2e, and Rx1c+, followed by recapturing the knight] 14 R2h, followed by P2e) (or 12... P2d 13 P2e Px2e 14 Nx2e G2c 15 R2h P*2d 17 Nx1c+ Nx1c 16 P*2f ! with P*1d next) 13 P*1b (13 N2e first may transpose, but gives white the extra option of 13... P2d) G5b
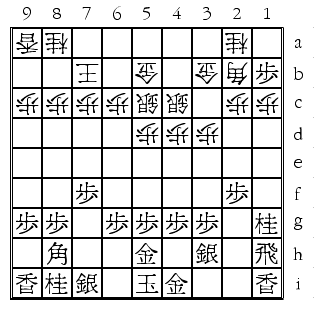
After 13... G5b
(13... P2d 14 P2e G2c 15 Px2d Gx2d 16 R2h P*2c 17 N2e P1d 18 P1a+ Bx1a 19 P*1c, promoting next.) 14 N2e P7d 15 P1a+ Bx1a 16 Nx1c= Nx1c 17 Rx1c+ B2b 18 +R1b (to force white to commit his pawn in hand) P*1a (else 19 L1c+ P*1a 20 +Rx2b, making the profitable exchange of dragon for bishop and gold) 19 +R1d (not 19 +R2a? G3a, winning dragon for just the bishop) P6d 20 N*1e !
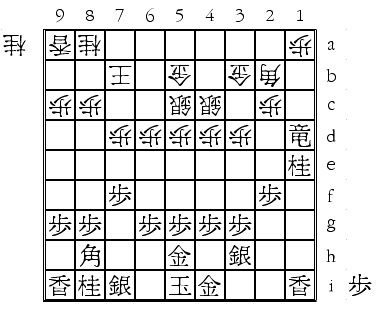
After 20.N*1e !
(black could just move into his Mino castle by K4h-3i, but the text move is really strong) N*3a 21 P*1b ! Px1b 22 +Rx1b P*1a 23 +R2a (looks like the previous note, but this time white cannot play G3a to trap our dragon because his knight is on that square) K6c (nothing better to do; this at least prepares N7c by guarding 7d) 24 P*1d ! N7c 25 P1c+ Bx1c 26 Nx2c+
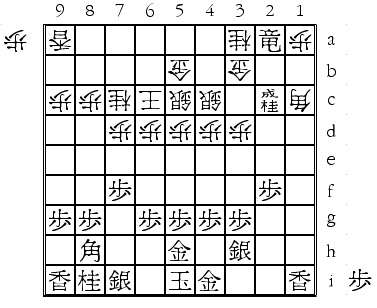
After 26.Nx2c+
winning bishop for knight, a huge profit.
Variation 1, the gold stays home :
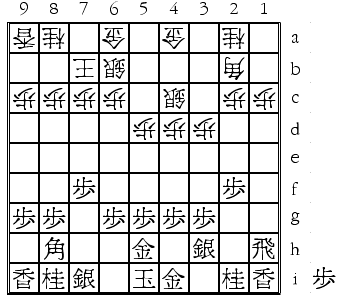
After 11.P2f
11... S5c 12 N1g S6d 13 N2e (I recommend omitting P*1b if white omits ... G3b. This knight sacrifice attack is also joseki. The P*1b attack is still possible here, but after 13 P*1b P5e 14 N2e P4e the bishop has a nice place to go, namely 4d, after the rook promotes. Although Masaki Izumi analyzes this as also good for black, the lines are more complex and less convincing than after ... G3b, because the tempo saved allows the bishop to get out of danger)
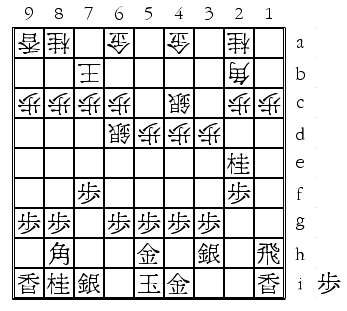
After 13.N2e
P2d (note that now 13... P5e could be met by 14 R2h ! followed by 15 Nx1c+ Nx1c 16 P*1d. With 13... G3b instead of 13... P5e 14 R2h is not so great due to 14... P4e exchanging off the target bishop, but instead 14 P*1b gives black the same attack as in our previous variation.) 14 Nx1c+ Bx1c (14... Nx1c 15 P*1d) 15 P*1b B3a 16 P1a+ N3c 17 +P2a (This line is good here because ... B6d is impossible. If white had left this option open by replacing ... S-5c-6d by other moves, I would advocate the P*1b version of the knight attack, as in our first variation.) B5c 18 R1c+ (usually 1b is a better square to promote on, but here the attack on the pinned knight is powerful) G4b 19 +P2b
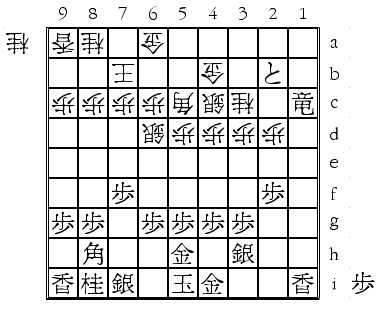
After 19.+P2b
and the threat of +P2c-3c is deadly.
Note that in the above variations, Black never got around to moving into his castle by K-4h-3i. Still, it's nice to know that black can do so if white makes any attempt to attack on his right side with moves like ... P7e or ... S6d-6ex7f (which is usually met by S7h).